Using super computers from Alliance Canada
Compute-canada is the provider of High Performance Computers (HPC) that allows you to achieve massive computation speed. It is a non-profit canadian organization providing free computation power to canadian institutions, so you should use it!
Don’t hesitate to check the Alliance Canada website for more tutorials.
Pre-requisites
- Our tutorial on unix_intro
- Our tutorial on ssh
- Basic knowledge on containerized app (Docker, singularity)
What will you learn ?
- Connect to a Alliance Canada node
- Submit a simple job to the server
- Launch a parrallelized containerized app
Connecting to Alliance Canada server
The first thing to do is to connect to their server! For that, you will need a compute-canada account:
Go to the login page
Click on
registerand enter your personnal information. For the lab, the insitution isudemand the department isPsychology. You should also ask your sponsor (in our case Pierre Bellec) for hisCCRI reference number.Once your registering is validated, you are ready to ssh into beluga:
ssh <your_username>@beluga.computecanada.ca
Warning
If you can’t connect at this point, you would want to check the server status.
When you first registered, everything wil be setup automatically so you can continue this tutorial without bothering.
Hand’s on
When using HPC, you have to tell it how to interact between your program and the computers. Execution of one program is called a job and you will require to create a job script to interact with the HPCs. The HPC uses a job scheduler called SLURM to decide when and where the job will be run.
Note
Using a scheduler has few advantages.
Because the service is free, it is a way to ensure fair share between all users through scheduling policies. It is also a way to regularize the usage over time, so there is no huge peak of usage at any moment. Finally, submitting a job through a scheduler allow the user to work on other tasks independently and in parrallel.
There are two main types of jobs on HPCs, serial and parrallel. A parrallel job is a way to sumbit multiple jobs at the same time, but each task must be independent from each other. It is particulary usefull in machine learning when you are selecting hyper-parameters for example. On the other hand, with a serial job you are limited to one task
Note
The serial task can still run in parrallel itself by using multiple cores/cpus.
For the rest of the tutorial, all the files are availables at https://github.com/ltetrel/lab-documentation/source/files
Submit a simple serial job
In this section we will submit our first serial job on the server!
We will create a simple job that output a sentence using a job script simple_job.bash.
Create a file
simple_job.bashon your computer, this will be your job script that we will submit later to Alliance Canada.1 2 3 4 5 6
#!/bin/bash

#SBATCH --time=00:01:00
#SBATCH --account=rrg-pbellec
echo 'Hello HPC world !'
sleep 5s
#SBATCHspecify what options you want to give to slurm:--timeis the duration of the job and--accountspecifies your organisation (usually your supervisor). You can add lot of informations there, just check the online documentation.Transfer this file from your computer to the server with rsync. You can also use sftp if you want to encrypt what you are sending.
rsync -rlt --progress simple_job.bash beluga.computecanada.ca:~/projects/rrg-pbellec/<user_name>/
Warning
An important practice is to use your home directory inside the lab group
def-xxxlike above. If you store data in the root directory at~, you will run out of memory fast because you have just 47GB in there.Submit the job script with SLURM,
sbatch simple_job.bash
To check the status of the job in the queue (time remaining, finish status etc..) you can type:
squeue -u <user_name>
When it is done, the output will be available in a file called
slurm-<id_of_job>.out. Check that the sentenceHello HPC world !indeed appears there.
Launch a parrallelized in a containerized app
Docker is a common and powerfull tool to bundle or “containerize” application into a virtual environment. This will help you to deploy and share easilly your work, without worrying about the reproducibility of the environment. You can’t use docker on HPCs because you need admin rights to run it, but singularity is allowed.
Before continuing this tutorial, you should install the latest singularity on your computer.
Create a single python script
par_job.pythat will output number from \(a\) to \(b\), every 10s.1 2 3 4 5 6
import sys
import time

for i in range(int(sys.argv[1]), int(sys.argv[2])):
    print(i)
    time.sleep(10)
To make sure it is working, type
python par_job.py 1 10.Pull a container from shub so you can use it to launch your script.
singularity pull --name anaconda3.simg shub://mjstealey/anaconda3
Test your script inside the container
singularity --quiet exec anaconda3.simg python par_job.py 1 10
Note
By default, singularity will mount your home inside the container. You can check that par_job.py is indeed inside the container:
singularity --quiet shell anaconda3.simg ls
Because the jobs will launch in parrallel, we need to specify the parameters for each task. One way of doing it is putting all the job parameters inside a file
params, where each line is one task. Here we will have 10 independent tasks, each running a loop from \(n+1\) to \(n+10\).1 2 3 4 5 6 7 8 9 10
1 10
11 20
21 30
31 40
41 50
51 60
61 70
71 80
81 90
91 100
Now, transfer the singularity image the python script and the parameters file from your computer to beluga
~/project/rrg-pbellec/<user_name>/.rsync -rlt --progress anaconda3.simg par_job.py params beluga.computecanada.ca:~/projects/rrg-pbellec/<user_name>/
We will submit a whole batch of jobs with just one script
simple_ar_job.bashusing the job array mechanism. This will allows us to run our application in parrallel among many nodes on Alliance Canada.1 2 3 4 5 6 7 8 9 10 11
#!/bin/bash

#SBATCH --time=00:20:00
#SBATCH --account=rrg-pbellec
#SBATCH --array=1-10

module load singularity/3.4
PARAMS=$(cat params | head -n $SLURM_ARRAY_TASK_ID| tail -n 1)
echo $PARAMS

singularity --quiet exec -B ~/projects/rrg-pbellec/<user_name>/:/scripts anaconda3.simg python /scripts/par_job.py ${PARAMS[0]} ${PARAMS[1]}
The line
#SBATCH --array=1-10tells you that this is ajob arrayand you specified here that you will run 10 parrallel jobs. Using--array=1-10%2you said that no more than 2 jobs will run in parrallel,--array=1-10:2is equivalent to--array=1,3,5,7,9.PARAMS=$(cat params | head -n $SLURM_ARRAY_TASK_ID| tail -n 1)is used to read all the parameters that you want to pass to the python script from the fileparams. Take care of the folder mount there,singularity --quiet exec -B ~/projects/rrg-pbellec/<user_name>/:/scripts, so the directory on your host~/projects/rrg-pbellec/<user_name>/is available inside the container at/scripts.Now you can submit the script to SLURM!
sbatch simple_ar_job.sh
Verify that your jobs are indeed in the queue:
squeue -u <user_name>
When your jobs are running, check the process for one job in one of the node by running,
srun --jobid <job_id> --pty htop -u <user_name>
Where
<job_id>is the id outputed bysqueue.Note
srun allows you to run a command on the worker node through
--ptyargument , in this casehtop.When the jobs are finished, check the log and all the files
slurm-<jobid>.out. Each of them should contain the numbers ranging from \(n+1\) to \(n+10\).
A few tips
Interactive node
It is possible to run interactive jobs on HPCs using the salloc command. You can use the same parameters as for a sbatch script, for example:
salloc --account=rrg-pbellec --time=00:01:00; echo 'Hello HPC world !'; sleep 5s
There is however a limit of 3h for this type of allocation.
When you need to do some heavy, long duration jobs, you should use the sbatch command described above.
Note
Alliance Canada have good reasons to do constrain the time, interactive nodes are really for short duration development, compiling or debugging of jobs. When running interactive jobs (eg. for a notebook) it is likely that a lot of time will be spent not running anything, preventing other users to use resources.
Debugging your application
It can be an hassle to debug code when using HPC: there is no default graphical forwarding for code editing or debugging. While it could be easier to use notebooks with an interactive node to debug some resssource intensive jobs, it is often better to combine interactive/non-interactive jobs with standard python files. Here are the diffrents steps you should follow:
- Ask for an interactive node and test your job on a small data sample. If it completes with errors, debug your applicaton.
- Submit a batch script with
sbatchto ininterruptedly run the heavy part with the full data and, if possible, dump the intermediary results. - When your heavy job completes, open an interactive node to explore these results, produce figures, etc…
The following approach should:
- encourage you to write cleaner and reproducible code (structured modules and functions with tests as opposed to often messy linear coded notebook)
- save you a lot of time
- run multiple variations of your analysis/model in parallel, rather than waiting for the heavy-work notebook cell to complete before changing it to test something else
- avoid consuming our allocation for idle jobs, and ensure that we keep an acceptable priority for all members of the lab
Managing large datasets
If you are working on machine learning algorithms, you will certainly need to load one of the big dataset that are available on beluga.
One such dataset can be for exemple cneuromod.
You might want to directly load the dataset from the global filesystem (at ~/projects/rrg-pbellec) to feed your model, but this not a good idea.
Indeed, this filesystem is slow, and because it is shared between many (many) users, you will likely expect lot of latency and slow I/O speed (and is the worth case data cache misses..).
The best way to go is to sync the data ~/projects/rrg-pbellec to the local compute node storage /localscratch/$USER.13055121.0 (usually reffered as scratch space).
The scratch path is different for each compute node, and because you will be allocated a new compute node each time, it is better to use the environment variable $SLURM_TMPDIR.
Note
The scratch space is just a SSD mounted directly on the compute node.
This is why it is much faster than the global filesystem (usually accessed through nfs).
Warning
One might expect a disk quota exceeded when transfering data to the scratch space.
this is because this SSD is shared between other users who have also accessed the compute node.
To avoid this, you can access a whole node to make sure you have access to all the local storage.
Check the nodes characteristic to know how much scratch space it has.
Another important point is that if your dataset contains a lof of files (more than a thousand), rsync can take some time to build the file list.
To reduce the transfer time, you will want to create this file list before using rsync.
Here is a concrete example with neuromod:
# create the file liste before (outside of the SLURM script)
# in this example we include `sub-01` and `sub-02`, and exclude `.git`
cd ~/projects/rrg-pbellec/datasets/cneuromod_new/hcptrt/
find . -type f -printf '%h\0%d\0%p\n' | sort -t '\0' -n | awk -F'\0' '{print $3}' | grep -e sub-01 sub-02 | grep -v .git > ~/list_files_neuromod
# now use the below inside a SLURM script
mkdir $SLURM_TMPDIR/hcptrt
rysnc -avP --info=progress2 --files-from=~/list_files_neuromod projects/rrg-pbellec/datasets/cneuromod_new/hcptrt $SLURM_TMPDIR/hcptrt
Finally, remember that if you need to transfer data from two different servers (for example from elm to beluga), it is better to use globus.
Check the Alliance Canada documentation for more details on this topic.
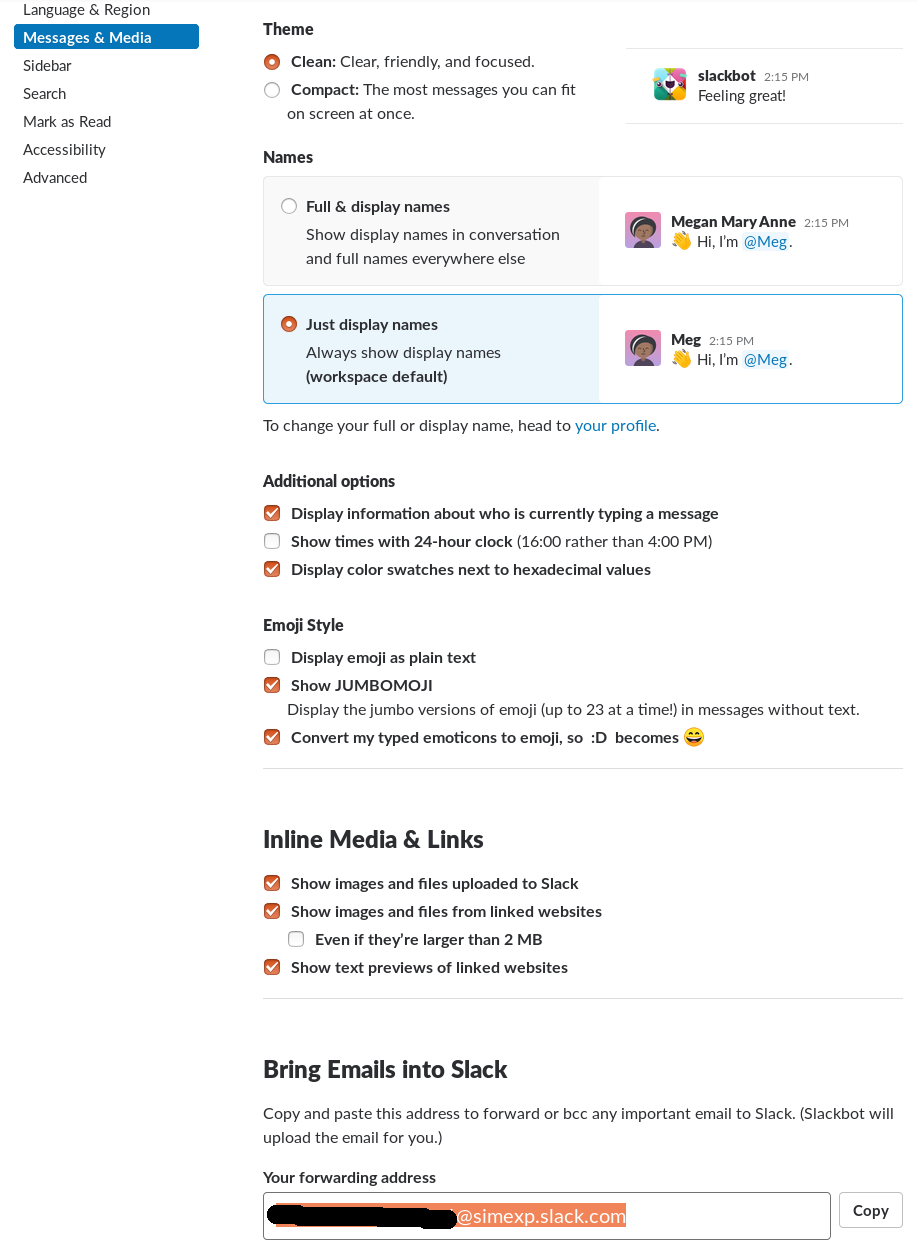
SLURM notifications on slack
It is possible to allow slack to send you notifications when a job is running, finished etc..
First create a mail in slack in preferences under messages and media section.
Then, you can use the provided email address to let SLURM send you notifications in slack (it will be sent by the slackbot).
Just insert the following in your .sh job script:
1 2 3 | #SBATCH --mail-user=XXXX@simexp.slack.com #SBATCH --mail-type=BEGIN #SBATCH --mail-type=END |
Questions ?
If you have any issues using Alliance Canada, don’t hesitate to ask your questions on the SIMEXP lab slack in #alliance_canada channel!