Make a python project from zero
It is most likely that the project you are currently working on heavily depends on existing softwares, whether from the lab or not. When working on a scientific project, the code will likely be published and/or re-used internally. Your project might end but the scientific journey of your code goes on. Starting a project with good python coding practices will help people in the future (yourself included) to understand the code.
Pre-requisites
- Our tutorial on An introduction of UNIX system and the command line
What will you learn ?
- Using Visual Studio code IDE
- Organize your python project
- Run basic vscode plugins on your code
- Improve code quality
Hands on
Ubuntu 18 is the preferrable OS
It is important to share a common development environment, because it reduces potential sources of bugs when working with the lab tools. Also, most of the neuroinformatic team and students heavily rely on the same OS, so getting help will be much easier.
That is why we highly recommend you to change your OS to a linux based one like ubuntu. If you can’t, then you can use the lab computers or continue with your original OS at your own risk.
Visual Studio code IDE
Visual Studio Code is a very popular IDE whether in industry or academia, supported in windows, macOS and of course linux. We invite you to install it by running the following commands on your computer:
sudo apt update
sudo apt install software-properties-common apt-transport-https wget
wget -q https://packages.microsoft.com/keys/microsoft.asc -O- | sudo apt-key add -
sudo add-apt-repository "deb [arch=amd64] https://packages.microsoft.com/repos/vscode stable main"
sudo apt update
sudo apt install code
We will now install the python vscode plugin:
code --install-extension ms-python.python
code --install-extension ms-python.vscode-pylance
And the auto-formatting tool:
python3 -m pip install autopep8
Cookiecutter template
Cookiecutter is a little command line utility to help you initialize a (python) project.
If you have already initialized a project on Béluga with Project management, you can clone your github repo and skip this section. If that is not the case, we will use our lab cookiecutter template to initialize a new project:
mkdir /PATH/TO/MY/PROJECT
cookiecutter -o /PATH/TO/MY/PROJECT -f  https://github.com/SIMEXP/cookiecutter-data-science
The whole repository layout should look like this:
├── LICENSE
├── Makefile           <- Makefile with commands like `make data` or `make train`
├── README.md          <- The top-level README for developers using this project.
├── data               <- Where the dataset will be installed
├── docs               <- A default Sphinx project; see sphinx-doc.org for details
│
├── models             <- Trained and serialized models, model predictions, or model summaries
│
├── notebooks          <- Jupyter notebooks. Naming convention is a number (for ordering),
│                         the creator's initials, and a short `-` delimited description, e.g.
│                         `1.0-jqp-initial-data-exploration`.
│
├── references         <- Data dictionaries, manuals, and all other explanatory materials.
│
├── reports            <- Generated analysis as HTML, PDF, LaTeX, etc.
│   └── figures        <- Generated graphics and figures to be used in reporting
│
├── requirements.txt   <- The requirements file for reproducing the analysis environment, e.g.
│                         generated with `pip freeze > requirements.txt`
│
├── setup.py           <- makes project pip installable (pip install -e .) so src can be imported
├── src                <- Source code for use in this project.
│   ├── __init__.py    <- Makes src a Python module
│   │
│   ├── data           <- Scripts to download or generate data
│   │   └── make_dataset.py
│   │
│   ├── features       <- Scripts to turn raw data into features for modeling
│   │   └── build_features.py
│   │
│   ├── models         <- Scripts to train models and then use trained models to make
│   │   │                 predictions
│   │   ├── predict_model.py
│   │   └── train_model.py
│   │
│   └── visualization  <- Scripts to create exploratory and results oriented visualizations
│       └── visualize.py
│
└── tox.ini            <- tox file with settings for running tox; see tox.testrun.org
Python code formating
You are now ready to dive into the development of your project! Go to your project directory and open vscode:
cd /PATH/TO/MY/PROJECT
code .
Let’s make sure that your auto-formatter is enabled by clicking on File > Preferences > Settings and select autopep8 after typing python formatting provider.
Search now format on save and enable it.
You can start populating the repository based on your need, keep in mind that you should fit your files with the current layout.
Note
We advise you to enable the dark mode in File > Preferences > Color Theme. Your eyes will be grateful. :)
You will realize that after saving your file, all the content will automatically auto-format ! That should save you lot of times, instead of formatting code yourself.
Linting your code
Where auto-formatter helps you re-format your code easilly, a linter guide you on the code syntax.
We will again check if you have enabled linting.
Type CTRL+SHIFT+p to open a dialog and type python enable linting to enable it.
If you see some code highlighted with wave underlining, check the message! Finally, you can run the following command to generate all the warnings:
pylint PATH/TO/YOUR/CODE
This gives you an idea about how well your code was written, you should have at least 7/10.
Reduce complexity of your code (optional)
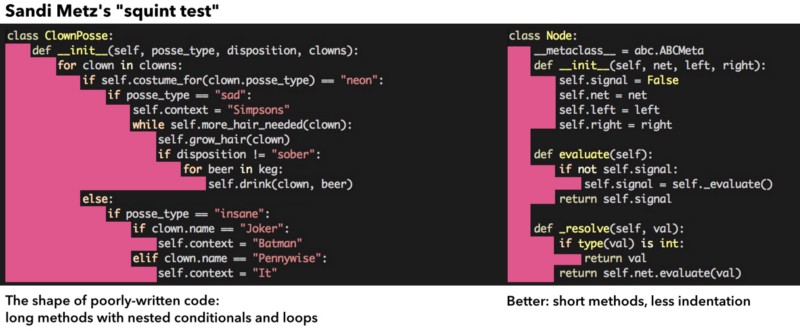
Learning about condition statement, for loop, and various error check is commonly considered a milestone in one’s journey to programming mastery. However, overusing these tools can make you code complex to understand for anyone, include future you. There’s a simple way to quickly assess the complexity of your code: look on the left hand side of the code, you want the line formed by the start of the code to be as straight as possible. Practically speaking, you want to reduce the use of conditions and loops, and write smaller methods.
If you want to gain immediate, further feedback on your python code, sourcery is a plug-in that gives you immediate feedback on code complexity.
Install this plugin:
code --install-extension sourcery.sourcery
To let sourcery give you feedback, you will need to have some part of the code in a function. Hover on a function you wrote and see the quality report on complexity, method length, and working memory. Find the explaination of the metric here. If the code metric shows you some sad faces, chances are you still have a lot of nested if conditions, and the function is big.
Warning
Don’t take bad scores too seriously! At the end of the day, they are just some references, not your collegue reading your code! Working memory is a metric invented by the sourcery team, rather than a common metric. This metric is designed based on the maximum number of variables that need to be held in mind when reading the code in the function. If you are interested in understanding the calculation of the metric, have a look at this blog post.
Remote vscode via ssh
You will mostly work on remote server, and it can be much more convenient to modify a file using visual studio IDE. Hopefully there is an easy way to work remotely on a project using the VS code extension remote ssh. You can find relevant information here: https://code.visualstudio.com/docs/remote/ssh-tutorial
Other optional advice
A good documentation on how to run your code in the README.md file is usually appreciated.
For others to be able to reproduce your experiments, it is important to make a good requirement file to list the software dependencies.
Add tests with pytest (in the src/test folder) will help people understand the functionality and robustness of your code.
To go further
To learn more about python best practices, you should definitively check the software-carpentry courses. Check also this post, which is a good guide on writting better research code.
Questions ?
If you have any issues using the UNIX command line, don’t hesitate to ask your questions on the SIMEXP lab slack in #python channel!