Deep learning on a remote server
You are probably in the case where you would like to use tensorflow on a remote server, to access the computation power from HPC. It is now relatively easy to have a ready to use environment for your applications, specially for GPUs!
Pre-requisites
- Our tutorial on An introduction of UNIX system and the command line
- Our tutorial on Secure Shell connection
- Basic knowledge on containerized app (Docker, singularity)
What will you learn ?
- Use singularity container
- Work on jupyter notebook for deep learning
- Establish secure connection and port-forwarding from the server to your computer
Why using containers ?
Container technology like Docker is a major breakthrough in data science. Indeed, it allows for reproducible, large-scale and burden-free environment setup. In the mean-time, jupyter notebook provides a portable interactive coding session, and is easy to use.
Hand’s on
Here, we will learn how to train a deep model on a remote server (could be CRIUGM, or Alliance Canada) using singularity.
Note
singularity containers are gaining a lot of popularity in the HPC world, because it is now easy as never to share reproducible
applications working smoothly on a remote server.
We are using cifar10 dataset using a simple CNN containing an encoder with 4 layers, and 3 dense layers.
1 2 3 4 5 6 7 8 9 10 11 12 13 14 15 16 17 18 19 20 21 22 23 24 25 26 27 | import tensorflow as tf (x_train, y_train), (x_test, y_test) = tf.keras.datasets.cifar10.load_data() x_train, x_test = x_train / 255.0, x_test / 255.0 model = tf.keras.models.Sequential([ tf.keras.layers.Conv2D(filters=16, kernel_size=(3, 3), activation='relu'), tf.keras.layers.MaxPool2D(), tf.keras.layers.Conv2D(filters=32, kernel_size=(3, 3), activation='relu'), tf.keras.layers.MaxPool2D(), tf.keras.layers.Conv2D(filters=64, kernel_size=(3, 3), activation='relu'), tf.keras.layers.MaxPool2D(), tf.keras.layers.Conv2D(filters=128, kernel_size=(3, 3), activation='relu'), tf.keras.layers.MaxPool2D(), tf.keras.layers.Flatten(), tf.keras.layers.Dense(256, activation='relu'), tf.keras.layers.Dense(128, activation='relu'), tf.keras.layers.Dense(10, activation='softmax') ]) loss_fn = tf.keras.losses.SparseCategoricalCrossentropy() model.compile(optimizer='adam', loss=loss_fn, metrics=['accuracy']) model.fit(x_train, y_train, epochs=5) model.evaluate(x_test, y_test, verbose=2) |
Upload your data and connect to the GPU server
Create a jupyer notebook
mnist.ipynbon your machine , containing the previous code.Upload the notebook on the server:
rsync -rlt --info=progress2 mnist.ipynb <user_name>@meleze.criugm.qc.ca:~/
Note
We are using the server
melezewhich has a GTX 1070, of course you can choose any server you have access to.Connect to
melezessh <user_name>@meleze
Launch the container
We will now launch this notebook using the container deep-neuro-docker,
already installed on our server at /data/cisl/CONTAINERS/deep-neuro-docker-gpu.simg.
It is a ready to use jupyter environment with tensorflow 2.0 for both GPU and CPU.
Note
Other software like pytorch are also considered to be included in the future.
Load the singularity module to enable it,
module load singularity
Run the tensorflow gpu container,
singularity exec --nv /data/cisl/CONTAINERS/deep-neuro-docker-gpu.simg jupyter notebook --notebook-dir=~/ --no-browser --allow-root
Note
CPU version is also available using the
deep-neuro-docker.simgcontainer.Warning
If you installed anaconda on your home folder, you will likely have some trouble because singularity image mounts by default your home to the container. It then loads the library from the host instead of the libraries inside the container! To avoid this, use the following command instead:
singularity exec -B <path/to/notebook>:/notebooks --no-home deep-neuro-docker-gpu.simg jupyter notebook --notebook-dir=/notebooks --no-browser --allow-root
Work on the notebook remotely from home
Because you are in your own home network, you will need to use elm as an external bridge to the criugm network.
Create two ssh tunnels so you can work on your browser locally (even if it is running remotely):
ssh -L 6789:localhost:6789 elm.criugm.qc.ca
ssh -L 6789:localhost:<server_port> meleze
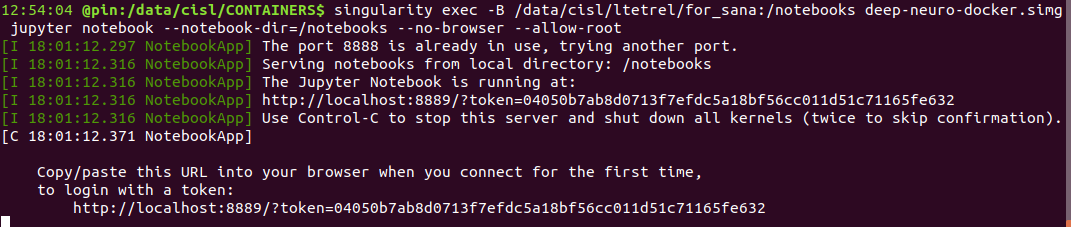
Where the output from jupyter on the remote server indicates what is the <server_port>, in this example it is 8889:
Note
If nobody uses a notebook server on the remote, <server_port> will typically be 8888.
Note
If you are inside the criugm network via ethernet (not wi-fi), you have direct access to the compute servers (meleze, ginkgo etc..).
In this case you don’t need to use elm, just connect directly to meleze ssh -L 6789:localhost:<server_port> meleze.
Click on http://localhost:6789, to open the localhost on your browser from your machine.
You should have now access to the usual jupyter environment, launch mnist.ipynb to check that it is indeed using the GPU!
Questions ?
If you have any issues using jupyter notebooks, you can ask on the SIMEXP lab slack in #python channel!
For any other questions related to setup (containers) ask in #neuroinformatics.